How to prepare a pay stub for your nanny
Nanny Payroll Excel Spreadsheet Nanny Payroll .pdf
In this step-by-step guide, I am going to show you how I create the bi-weekly pay stub for our nanny.
If you want to follow along, click on this link to download the simple Excel payroll spreadsheet I am using. Here is the spreadsheet as a .pdf file.
Before you start, please read our disclaimer: I am showing you how I have created nanny pay stubs for multiple nannies. However, I am no tax or payroll expert, and you are responsible for making sure that the pay stub you give your nanny is correct. In addition, applicable rules and regulations vary widely depending on where you live in the US. My family lives in Seattle in Washington State. Your state and maybe even your city and county might impose their own requirements on what you have to include on your pay stub.
The parts of the pay stub
I will take you through the main parts of the pay stub spreadsheet I am using. Then we will go over every individual entry.
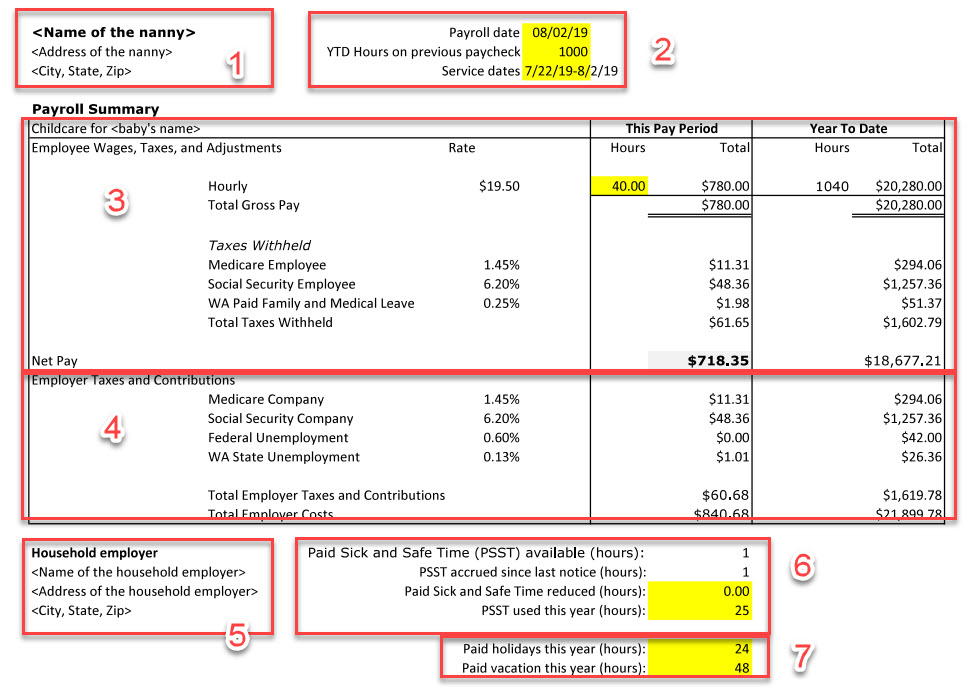
The main sections of the pay stub are:
- Nanny name and address.
- Relevant dates and hours from previous paycheck.
- Employee wages, taxes, adjustments and net pay.
- Employer taxes and contributions.
- Employer name and address.
- Seattle paid sick and safe time.
- Paid holidays and vacation.
Nanny name and address
This section of the pay stub is the easiest of all. When you hired your nanny, you needed her name and address details for several pieces of paperwork. For example, for filing the I-9 form. Put the same information on the pay stub. You should also tell your nanny that you need to be informed of any address changes.
Dates and hours worked so far
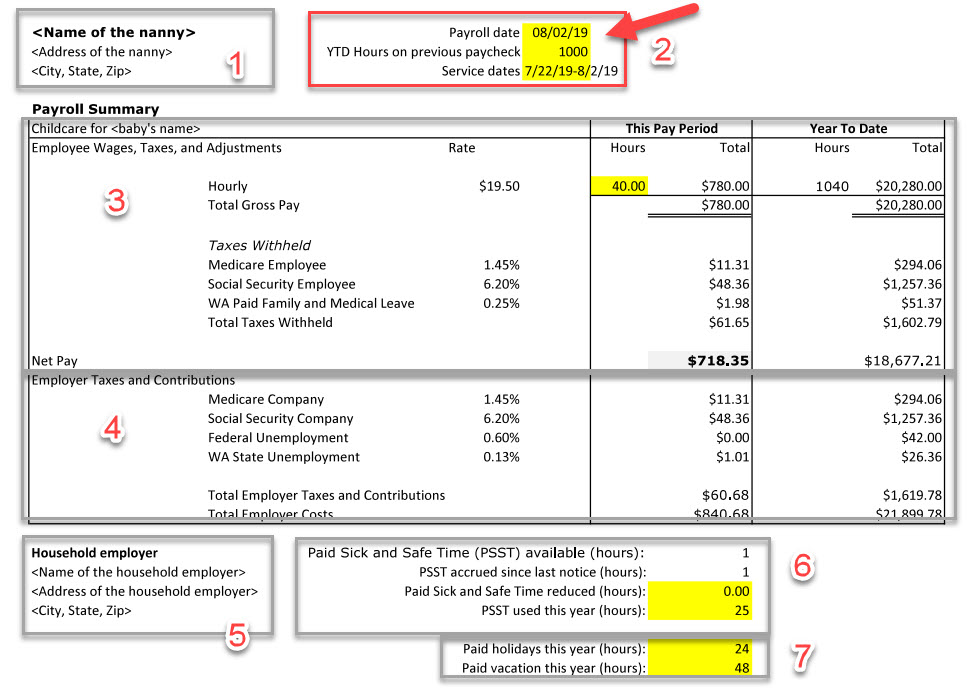
In this section of the spreadsheet, put down the service dates this pay stub is covering. In my case, I prepare a pay stub every two weeks. So, the service dates are typically the Monday of the first week to the Friday of the second week. The payroll date is typically the last day of the service period. If the pay stub covers nanny services from 7/22 to 8/2, I will choose 8/2 as the payroll date. This is also the date I give the paycheck to my nanny.
The year-to-date (YTD) hours on previous paycheck are just that: the nanny hours this year before the current payroll period. Let’s consider an example and say the pay stub covers nanny services from 7/22 to 8/2. To calculate the year-to-date hours, I am looking at the previous pay stub. Then I add the year-to-date hours and the number of hours on that pay stub.
Employee wages, taxes, adjustments and net pay
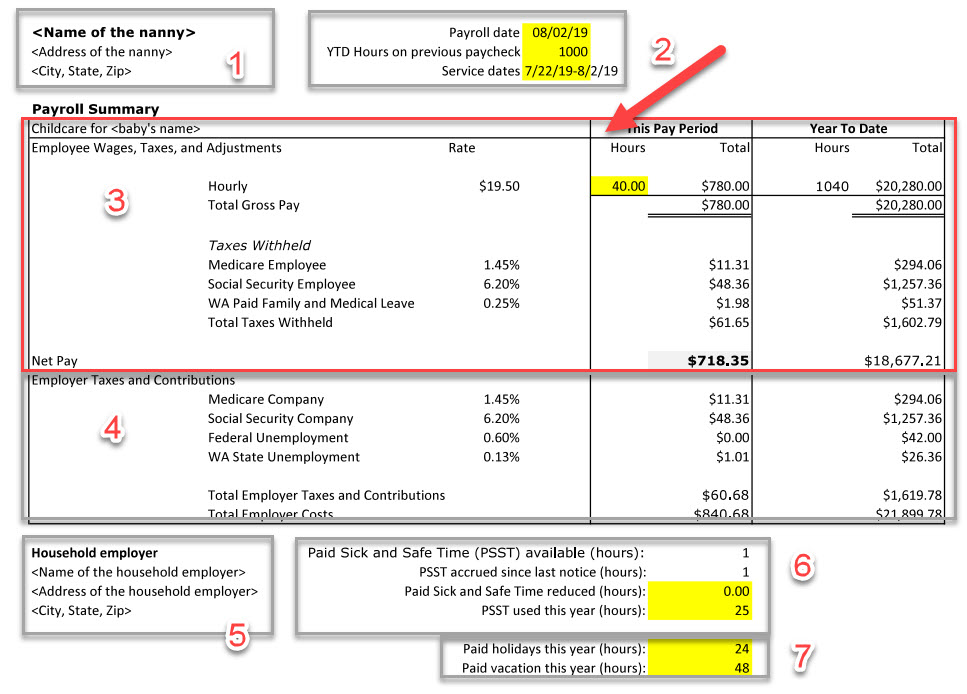
This section is the heart of the payroll spreadsheet. The good news is that once you have set up your nanny’s hourly pay rate and the tax rates, most of this section will be automatically calculated by Excel. Let’s go over the fields one-by-one:
- Hourly rate. This is the amount of money you pay your nanny per hour. As you can see in the example spreadsheet, we paid $19.50 to the last nanny we worked with. This rate largely depends on where you live and what rate you can afford, so it is possible the rate will be much higher or lower in your situation.
- Hours. This is the number of hours you paid your nanny during the last pay period. This includes paid vacation or sick time. The purpose here is to calculate the nanny’s gross pay, and the pay from which we have to pay the employee share of taxes. Have a look at this IRS publication and search for ‘sick pay’ and ‘vacation pay’. The document for 2019 mentions that medicare, social security and FUTA all have to be paid including sick and vacation pay.
- Total gross pay. These fields are automatically calculated by the spreadsheet by multiplying the number of hours with the hourly pay.
- Taxes withheld. These are the taxes the nanny needs to pay. The pay that the nanny receives is reduced by these taxes.
- Medicare and Social Security employee. This is the employee portion of the social security taxes. For details, please consult this IRS document. There is a wage base limit for social security, which currently is over $130,000. I cannot afford to pay our nanny that kind of money, so the sample spreadsheet is not considering these limits. The spreadsheet just applies the standard 6.2% for social security and 1.45% for the medicare tax.
- WA Paid Family and Medical Leave. This is an entry specific to Washington State. If you live in another state, you can delete this entry. However, your state might have other programs that are relevant for you. Here is more information about the Washington State Paid Family and Medical Leave program. Essentially, the employee pays 63.333% of 0.4%, i.e., 0.253332%. You can see 0.25% in the spreadsheet I am using, but if you look at the formula, I am just not showing the full fraction (0.253332%) in the spreadsheet.
- Total taxes withheld. This gets calculated automatically. This is the total amount of taxes we withhold from the nanny’s pay. This does not include the federal income tax, and you should tell your nanny about this (see below for a discussion.)
- Net pay. This is arguably the most important line item for your nanny. This is what you need to pay to your nanny. It is the amount of money on the check for her.
One additional item to point out is that the spreadsheet I am using does not include an entry for withholding federal income tax. According to this IRS document, you are not required, in 2019, to withhold federal income tax for your household employee. I did withhold this for one nanny we employed, and it is an additional hassle. You can do it if your nanny really wants you to, but I don’t recommend it. In any case, you should have a discussion with your nanny and tell her that she will have to pay federal income taxes. This further reduces the net amount that she gets paid in the end.
In summary, what you can see in the example spreadsheet is that the nanny’s gross pay was $780 for 40 hours. However, she will only get a check for $718.35. And we are not withholding federal income tax, which means that she will have to pay that additional tax as well.
Employer taxes and contributions
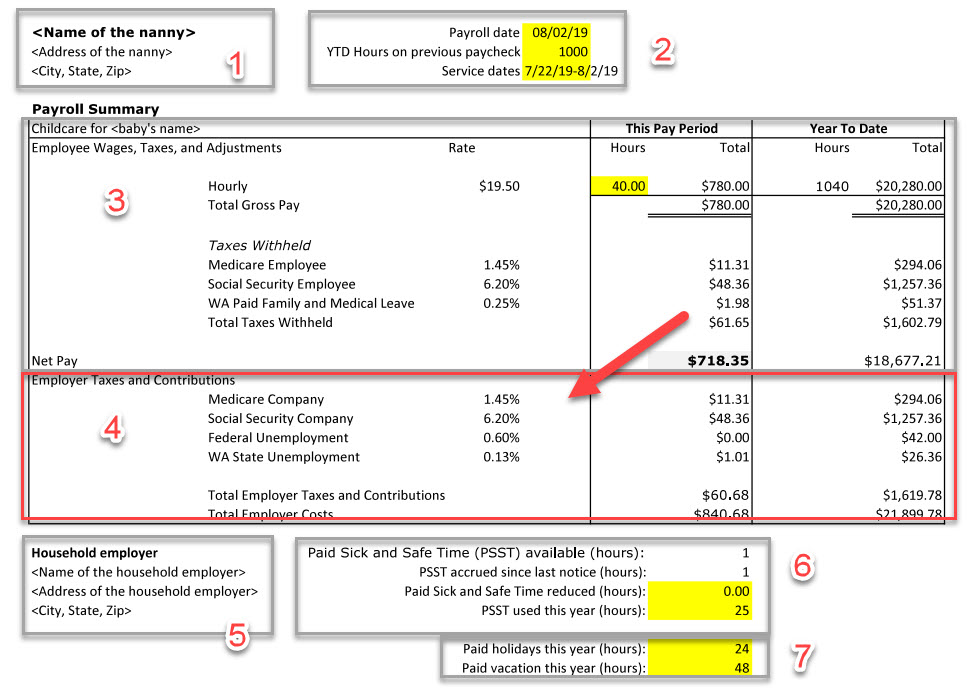
From an employer perspective, the employer section of the pay stub is very important. It tells me how much money I really have to pay to employ our nanny. It also shows the nanny that I am actually paying her more than the hourly rate we agreed on. In our example, the nanny’s gross pay was $780 for 40 hours. However, as the employer, I will have to pay $840.68. In other words, I ultimately pay an hourly rate of $21.02. Personally, I think it is important for me to see this, and also for the nanny. That is why I include it on the pay stub. The hourly rate is $19.50. And while she will make less than $19.50 per hour after taxes, I am paying $21.02 per hour!
- Medicare and Social Security company. These entries relate to the employer part of the Medicare and Social Security taxes. Authoritative information can be found in this IRS document. As of 2019, the employer share was 1.45% for Medicare and 6.2% for Social Security. When you read all the details about these taxes, there are special income limits and other rules. However, our nannies did not fall into any of these special categories. The simple spreadsheet we are using therefore does not consider these special situations.
- Federal Unemployment. The Federal Unemployment Tax (or FUTA) pays for unemployment compensation for workers who lose their jobs. You can find details about this here. Essentially, depending on the state you live in, we pay the FUTA tax of 0.6% on wages of up to $7000. After that, there is no FUTA tax. Our spreadsheet considers this limit automatically.
- Washington State unemployment. Washington State has its own unemployment insurance program. And your state likely has one, too. Every year, Washington State sends us a letter telling us about our tax rate (in reality, the tax is for slightly more programs than only the state unemployment insurance.) Our tax rate for 2018 was 0.13% and for 2019 it was 1.13%.
- Total employer taxes and contributions. This field sums up all of the employer taxes and contributions.
- Total employer costs. This is the total cost we pay for employing the nanny. In our example, the hourly rate for our nanny is $19.50. However, considering everything, we pay $840.68 for 40 hours of work. This is an hourly rate of $21.02!
Note that I am not paying the employer portion of the Washington State Paid Family and Medical Leave program. According to this site, at the time of writing this article in late 2019, employers with less than 50 employees are not required to make any contributions. However, as a household employer we need to withhold and pay the employee portion of the program.
Employer name and address
I put my name and address into this section of the pay stub.
Seattle paid sick and safe time
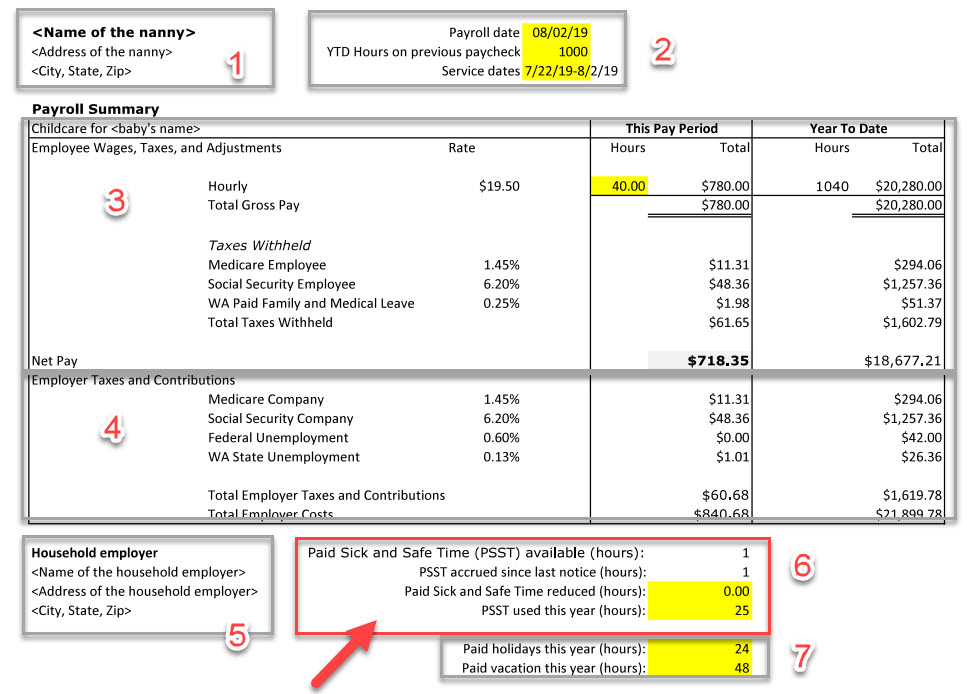
There are many layers of government, and each layer can impose their own paperwork requirements. The City of Seattle, where I live, has a Paid Sick and Safe Time ordinance. Find more information about this here. This ordinance comes with its own pay stub reporting requirements. In our example spreadsheet, I put in the ‘PSST reduced’ and the ‘PSST used this year’ fields. The other fields I have set up so they calculate automatically.
If you don’t live in Seattle and you want to adapt our spreadsheet process, just delete the PSST section.
Paid holidays and vacation
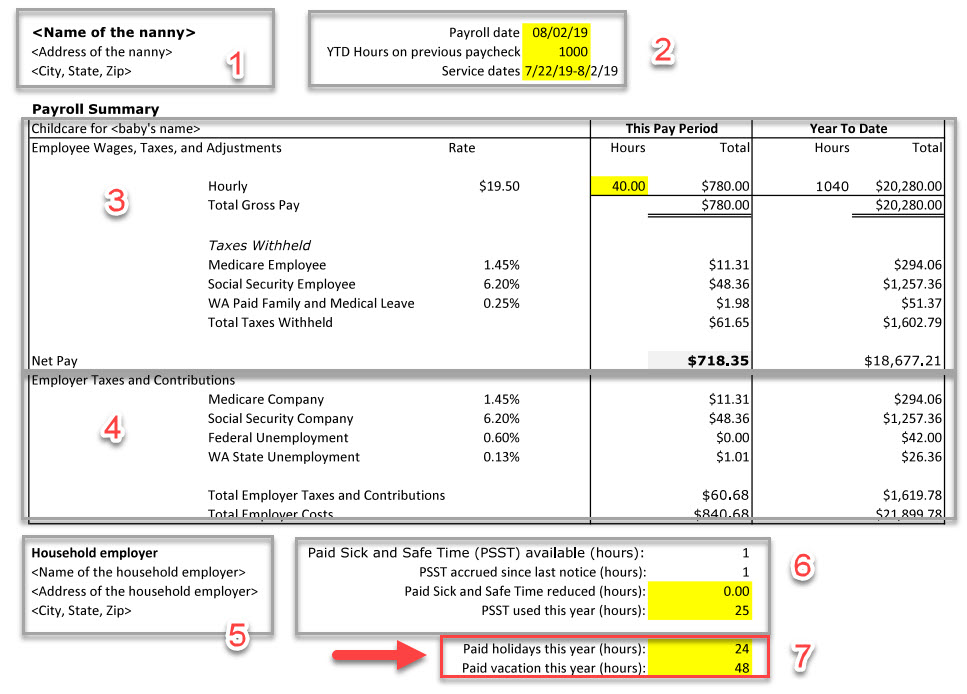
In this section of the pay stub, I keep track of the amount of paid holidays and vacation. Regarding paid holidays, I agree with the nanny every year what holidays will be paid and send her an email to make sure we have the details in writing. In 2019, we paid for 5 holidays. I handle the agreement for paid vacations similarly.
Conclusions
Preparing the pay stub for your nanny yourself is not a lot of effort once you have the right process in place. However, keeping up with changing regulations requires time and effort. If you think this is not for you, consider using any of the many nanny payroll services.
If you have any questions, don’t hesitate to contact me on Twitter (see my Twitter handle below.)
Good luck! And happy parenting!